It turns out that cloning and managing private git repo’s in Chef is not as easy as it looks. That said, I have a method that works. I have no idea if this is the preferred method or if there are any easier ways but this worked for me, so let me know if there is an easier way and I will be glad to update this post.
First, I’d like to give credit where it is due. I used this post as a template as well as the SSH wrapper section in the deploy documentation on the Chef website.
The first issue is that when you connect to github via SSH it wants the Chef client to accept its public fingerprint. By default, if you don’t modify anything SSH will just sit there waiting for the fingerprint to be accepted. That is why the SSH Git wrapper is used, it tells SSH on the Chef client that we don’t care about the authentication to the github server, just accept the key. Here’s what my ssh git wrapper looks like:
You just need to tell your Chef recipe to use this wrapper script:
# Set up github to use SSH authentication
cookbook_file "/home/vagrant/.ssh/wrap-ssh4git.sh" do
  source "wrap-ssh4git.sh"
  owner "vagrant"
  mode 00700
end
The next problem is that when using key authentication, you must specify both a public and a private key. This isn’t an issue if you are running the server and configs by hand because you can just generate a key on the fly and hand that to github to tell it who you are. When you are spinning instances up and down you don’t have this luxury.
To get around this, we create a couple of templates in our cookbook to allow our Chef client to connect to github with an already established public and private key, the id_rsa and id_rsa.pub files that are shown. Here’s what the configs look like in Chef:
# Public key
template "/home/vagrant/.ssh/id_rsa.pub" do
  source "id_rsa.pub"
  owner "vagrant"
  mode 0600
end

# Private key
template "/home/vagrant/.ssh/id_rsa" do
  source "id_rsa"
  owner "vagrant"
  mode 0600
end
After that is taken care of, the only other minor caveat is that if you are cloning a huge repo then it might timeout unless you override the default timeout value, which is set to 600 seconds (10 mins). I had some trouble finding this information on the docs but thanks to Seth Vargo I was able to find what I was looking for. This is easy enough to accomplish, just use the following snippet to override the default value
timeout 9999
That should be it. There are probably other, easier ways to accomplish this and so I definitely think the adage “there’s more than one way to skin a cat” applies here. If you happen to know another way I’d love to hear it.
I am writing this post with the intention of giving readers (and other sysadmins) that are unfamiliar with Git a brief introduction to get up and running as quickly as possible. There are numerous guides out there but none I have found so far with the spin of getting things working quickly for system administrators. I recently went through the process of submitting some work of mine to an Open Source project and went through all of the work myself and thought I would write up a little guide to getting started, just in case anyone is interested. Because of this experience, I thought the process could be streamlined if I presented a simple set of steps and examples for other sysadmins so that they can get started and get comfortable using Git as quickly as possible. By no means am I advocating that I am a Git expert, I simply know enough to “do stuff” so take this guide for what it is, a simple introduction. Hopefully it is enough to get the ball rolling and get you hooked on revision control!
Step 1: If you haven’t already, head over to github and set yourself up with a free account. The steps are trivial, just like setting up any other account. You will need to install Git on you machine locally so that you can do everything, sudo apt-get install git in Ubuntu, or, with a little more legwork if you are using Windows.
Step 2: Once you are all set up and running you can either create a new repository or fork off of somebody else’s repo, which will essentially make a copy of their work to your user account in github. Since I was contributing to a public project I forked their repo. This is typically (for beginners at least) done through the website by browsing to the project you are interested in and then clicking the fork button at the top right.
Once you have copied or forked the project you want, you can begin working on making your own changes and updates to the project. This is where much of the initial confusion came in for me. I should make a note here; there are a few things that must be done through the website and others that should be done with the git tool you downloaded and installed earlier.
Step 3: Clone the repo down to your machine locally to begin making changes. This is done via command line with the following:
Once you have the repo cloned down to your machine, let’s create a branch which we will use to work on the specific piece of the project we are working on. There are a few more common commands that are used for working with repos. In some scenarios the public project may change or get updated while you are working on it so you might want to pull in the most recent changes to your own fork. The following commands are used to work with public repos and forks.
Fetch new changes from original repo:
git fetch upstream
Merge the fetched changes into your working files:
git merge upstream/master
Pull newest updates and changes from a for or repo:
git pull
Okay, let’s assume that our repository is all up to date and we are ready to start working on the new changes that we want to make. First, we need to create a local branch to make the changes on. The command for creating a branch is:
git checkout -b $topic
git checkout -b my_topic
Where $topic is the specific change you will be working on. Then go ahead and make your changes and/or updates with your favorite text editor. If you have multiple changes to make it may be a good idea to create a few different branches using the command above. To switch between branches use the following:
git checkout $branchname
git checkout my_topic
If you are working on a branch and either don’t want to commit the changes or the branch becomes obsolete, you can delete the branch with either of the following commands:
Step 4: Assuming you are all done with your branches and are finished making your changes the next step is to commit the changes. This will basically record a snapshot of (the state) the files. Typically for a commit you will want to do one thing at a time to keep track of things more easily. So you will make one change and then commit and then repeat if there are numerous changes that need to be made. The command is:
git commit -am "update goes in here"
Now that we have created a branch, made our changes, written our changes so that git knows about them and can keep track of them, we are ready to go ahead and merge the code that we have changed locally back up to github. Start by pushing the branch up to the github repo.
Next, merge your changes. This is done by changing to the “master” branch and then issuing a merge command on the branch that was created to make changes into. So here is what this process would look like:
alternatively if you just want to quickly push out a change to the master branch you can issue a git commit locally and then a git push to update the master branch without merging the items first.
git commit -am "updated message"
git push
I like to use this for local repositories where I just need to get things up quickly.
Step 5: At this point everything should be accurate on your own personal github page. You can double check your commit history or look at the last update time to make sure your changes worked their way into your public fork or repo. If you are contributing to a public project the final step is to issue a pull request on the github site. Once this is done, wait to hear back from a moderator of the project if your changes need to be fixed before they accept them or wait for a response saying that your changes were good and get merged to the project.
Git, to me, was a little bit confusing at first. Like I said earlier, I still only have a generic and basic understanding but I think it is important for system administrators to know how to commit code to projects and how to keep track of their own code and projects as well. Even if the code is only small scripting projects it is still beneficial to publish since github is a public site. Potential colleagues and employers can browse through your work, which increases your visibility and can even lead to job offers.
If you’re interested in learning more, I found this site to be a great resource.
Every once and awhile you will probably encounter a situation where you need to enable and then use telnet in a security focused environment. In certain situations telnet can be a great tool to test the functionality of firewall rule. Iif you aren’t certain whether or not a rule is working telnet can be a great way to help debug. The problem in Server 2008 and above is that telnet isn’t enabled by default. Luckily with PowerShell it is easy to enable the telnet functionality.
The following set of commands is a quick depiction of how you can enable telnet from a PowerShell prompt to ensure the ability of testing certain ports. Try it out.
Bam! As always, it is always easier to stay in command prompt and this is a great way to test port connectivity. I can understand why telnet is disabled by default on fresh server builds but sometimes it can become useful to have telnet as a tool to test connectivity. If you would like to debate the merits of disabling/enabling telnet on a server just drop me a line, I obviously will not be focusing on this aspect here. Anyway, just as easily as it is to enable telnet through PowerShell it can be disabled with the following command. If you already have the server manager module imported, skip to the second command.
It seems like everybody is using git these days. And for most, not everybody is stuck using Windows in their day to day workflow. Unfortunately, I am. So that means it is much more painful to get up and running with a lot of the coolest and best open source projects that are offered by members of github and other online code repositories being shared via git. However, there is hope and it is possible for Windows users to join the git party. So in this post, I would like to describe just how to do that. And it should only take a few minutes if done correctly. I will mention beforehand that there are a few steps that need to be completed in order for this technique to work successfully that typically are taken care of in a Linux or OSX environment.
The goal of this post is to work through these steps as best I can to get users up and running as quickly as possible and as easily as possible, reducing the amount of confusion and fumbling around with settings. This post is designed for beginners that are just getting their feet wet with git but hopefully others can use it as a resource if they are coming from a different environment and are confused by the Windows way of doing things.
First step – Download and install the git port for Windows.
This is pretty straight forward. Download and run the executable to install git for Windows. If you just want to get up and running or are lazy, you can leave all of the defaults when you run through the installation wizard.
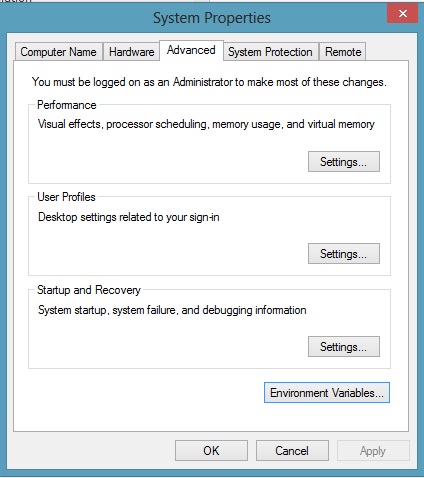
Second step – Add the git binaries to your system path variable.
This is the most important step, because out of the box git won’t work in your ordinary PowerShell command prompt, it needs to be opened separately. So to fix this and add all the necessary binaries open up your environmental variables (in Windows 8).
Third step (optional) – Download and install posh-git for better PowerShell and git integration.
I have highlighted part of this process before in an older post but will go through the steps again because it is pretty straight forward. To be able to get posh-git you need to have a sort of PowerShell package management tool called PsGet (instructions here). To get this tool run the following command from your PowerShell command prompt.
Once the command has completed you should be able to simply run this install command and be finished.
install-module posh-git
That should be it. With these simple steps you should be able to utilize git from the command line like you are accustomed to on other operating systems. As I said, there is a tad more leg work but you can really utilize the flexibility of PowerShell to get things working. I hope it helps, and as always let me know if you have any tips or questions.
Since I don’t really want to get in trouble for this, I need to put in a disclaimer. Some of these tools can be invasive and if you are running them against somebody then I take no responsibility for their actions against you. I am testing these tools against my own site so the consequences are minimal. Just be aware that there can be serious consequences for using these tools on sites and companies against their will. I don’t want anybody going to jail.
The tools
Let’s take a poke around with WP Scan. This tool is a WordPress vulnerability scanner, often packaged together with Backtrack or the newer Kali Linux pentesting distro. WPScan helps find and eliminate security weaknesses in your WordPress site. More information about this tool can be found here.
There are many other tools out there but for basic WordPress scanning this tool should suffice, because it offers a number of things that are of interest in a nice single tidy and clean interface. Other tools that may be of interest include tools like Burp Suite, SQLmap, username enumeration through Metasploit and other reconnaissance tools.
The process
Most real world attacks will reach for the low hanging fruit when it comes to exploiting WordPress sites, typically gaining access to a site through password exploitation. With so many WordPress sites going up it becomes easy to move from site to site trying different password brute forcing attacks, so that’s where you will see a large number of attacks. There are others as well, such as vulnerability attacks, SQL injection attacks, XSS, etc.
To begin the process let’s start gathering some information about the WordPress site that will be the focus of this attack, my blog. Here, I am running WPScan through Kali Linux, so the syntax may change depending on how you decide to use this tool. Let’s see what basic information we can get about my blog. This site scan will attempt to gather the basics of the site it is scanning. For help just type ‘wpscan –help’.
wpscan --url http://thepracticalsysadmin.com
Let’s see how far we can get with the password brute forcing method. To enumerate a list of user account names use the following,
wpscan --url http://thepracticalsysadmin.com --enumerate u
If you get any interesting results from this scan, for example the result returns the username admin, go ahead and see if you can brute force the account.
There are more features packed in this tool so take some time to explore what all it can do (preferably on a test box). Odds are that on a site that hasn’t been properly locked down you can probably get in, one way or another. I wouldn’t recommend running wpscan against this site though because I have already beefed up the security and temporarily block access if users run malicious scans against the site.
Locking it down
There are a number of techniques to help reduce the attack surface for your WordPress site as well as methods to increase the difficulty of breaching your site. The first and foremost is the use of strong passwords. That should be a given and I won’t get into the details here of how important strong passwords are. Another (hopefully) obvious technique is to keep up to date with your patches. Whether it be on the Operating System or your WordPress site/plugins you should try to be proactive about patching your systems. The third and final obvious solution I will mention are getting good backups. If your site does get compromised then it is incredibly helpful to have a point in time to go back to rather than starting over from square one. There are plugins designed to help with this process and even doing it by hand isn’t that difficult. You can get back on your feet even if you only have a database dump from your site at some point in the past.
I’d like to specifically mention some good tools to use if you have publicly facing SSH; one of which is fail2ban. This tool can be used as a layer of defense to slow attackers down by detecting malicious activity and banning IP addresses. Another great tool, a handy plugin for WordPress sites is called Better WP Security. This is an easy to use site hardening tool that can fill up weaknesses and security holes quickly for somebody that doesn’t necessarily have security in the foreground of their minds.
By utilizing these basic techniques you will infinitely increase your WordPress site’s security and make it much more difficult to attack and exploit. There are of course other techniques to improve security but at a certain point it can become a balancing act. *Most* site admins aren’t overly conscious about security and so do not spend a lot of time on their security efforts, they are more concerned about the content and getting things up. Likewise, some are probably more prone to lock things down more than they perhaps need to. It is important to maximize your effort, and to cover the most important security aspects by implementing the basics.