It seems like everybody is using git these days. And for most, not everybody is stuck using Windows in their day to day workflow. Unfortunately, I am. So that means it is much more painful to get up and running with a lot of the coolest and best open source projects that are offered by members of github and other online code repositories being shared via git. However, there is hope and it is possible for Windows users to join the git party. So in this post, I would like to describe just how to do that. And it should only take a few minutes if done correctly. I will mention beforehand that there are a few steps that need to be completed in order for this technique to work successfully that typically are taken care of in a Linux or OSX environment.
The goal of this post is to work through these steps as best I can to get users up and running as quickly as possible and as easily as possible, reducing the amount of confusion and fumbling around with settings. This post is designed for beginners that are just getting their feet wet with git but hopefully others can use it as a resource if they are coming from a different environment and are confused by the Windows way of doing things.
First step – Download and install the git port for Windows.
This is pretty straight forward. Download and run the executable to install git for Windows. If you just want to get up and running or are lazy, you can leave all of the defaults when you run through the installation wizard.
Second step – Add the git binaries to your system path variable.
This is the most important step, because out of the box git won’t work in your ordinary PowerShell command prompt, it needs to be opened separately. So to fix this and add all the necessary binaries open up your environmental variables (in Windows 8).
Computer -> Properties -> Advanced -> Environmental Variables
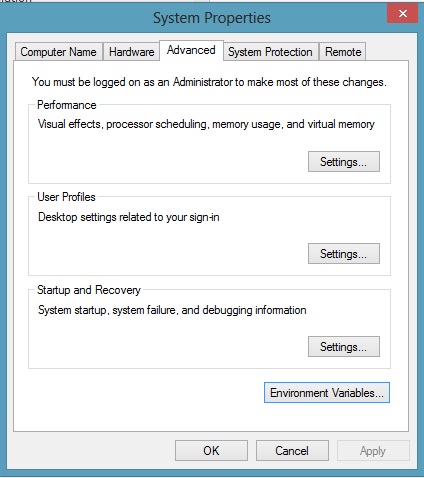
and add the following value to the PATH variable.
C:\Program Files\Git\bin
Here is what this should look like in Windows.

Third step (optional) – Download and install posh-git for better PowerShell and git integration.
I have highlighted part of this process before in an older post but will go through the steps again because it is pretty straight forward. To be able to get posh-git you need to have a sort of PowerShell package management tool called PsGet (instructions here). To get this tool run the following command from your PowerShell command prompt.
(new-object Net.WebClient).DownloadString("http://psget.net/GetPsGet.ps1") | iex
Once the command has completed you should be able to simply run this install command and be finished.
install-module posh-git
That should be it. With these simple steps you should be able to utilize git from the command line like you are accustomed to on other operating systems. As I said, there is a tad more leg work but you can really utilize the flexibility of PowerShell to get things working. I hope it helps, and as always let me know if you have any tips or questions.