Setting up a Linux based DNS server with BIND

As my home lab continues to grow and becomes increasingly complicated I need an easy way to access my servers and network resources by their name rather than their addresses on the network.  By using DNS I can quickly and efficiently access these network resources by  their given host names, not having to worry about the growing complexity of the network.  I looked into a few different options for accomplishing this task but ultimately decided to go with the tried and true Linux BIND implementation.  The installation and configuration isn’t all that complicated to get up and running, so in this post I will go through some of the high points of my experience in standing up this service.  Let’s get going.

First, we need to install the proper packages.  By the way I was using a Debain 6.0 minimal VM for my server in this project.  So to install this stuff you need to update your repos to look for the packages.

apt-get update

Then the necessary packages

apt-get install bind9 dnsutils resolvconf

We need to configure the correct files to make our DNS function properly.  Everything that we need to configure (for Debian distros) should be located in /etc/bind.  So the first thing to change is the named.conf.local file to create the zones for our local network.  We need a zone for resolving names to IP addresses as well as a zone reverse DNS.  If you don’t know what that is, you can find more here.  In my configuration psa.local is my local domain so any hostname will resolve to hostname.psa.local in DNS.  Here is what my named.conf.local configuration file looks like:

Next, we need to set up our zones to point to the correct hosts.  The easiest way is to use the db.local as a template and copy it to a new file.  cp /etc/bind/db.local /etc/bind/db.psa.local Here is what my db.psa.local file looks like:

We need to do the same thing with our reverse records.  For me, his file is located in db.192 and we will use db.127 as the template for this file.  cp /etc/bind/db.127 /etc/bind/db.192. If you are using a different type of network layout adjust accordingly.  For example if your network is a 172.x.x.x network just name the file as db.172 or whatever the network is.  Here is what the configuration looks like, it is similar to our forward lookup zone.

Now we should be able to resolve host names (both forward and reverse) to the entries we’ve added to these configuration files.  Next we need to edit our resolv.conf file to get our host name resolution to work smoothly.  So edit /etc/resolv.conf with your favorite text editor and make the necessary changes.  Here is what mine looks like after the necesary tweaks.  NOTE I haven’t figured out why yet, but every time you restart your bind service it wipes this config out, I will update this when I figure out how to make these changes persistent.

Finally, and most importantly, here is my final named.conf.options file, with all the troubleshooting done.  This file tells bind where to forward DNS queries externally as well as other important configuration options.  You can adjust the forwarders to whichever public DNS server you choose.  I chose two well known DNS servers.  There are a few things to note here.  If you are having issues with anything check the log files 🙂  At first I had strange resolution errors for anything that was external to my domain.  The logs helped me pinpoint where the problems were and to make the necessary changes.  The most important iformation for troubleshooting is located in /var/log/syslog.

The last few entires in this file are very important for getting external DNS to resolve and is not part of the default configuration file.  You will have to add these in yourself.

allow-recursion { any; };
21 allow-query { any; };
22 allow-query-cache { any; };

Start/restart your DNS service for these configuration files to get loaded in.  /etc/init.d/bind9 restart and you should be able to ping your newly added entries by host name.

That’s it.  You can test these settings for yourself, host -l psa.local will list the hosts in your zone file.  I should also note, machines that were already on the network will need to have their DNS configurations adjusted to point to the new DNS server by editing the /etc/resolv.conf file like we did on the server itself.  Piece of cake.  With local DNS in place it makes things much easier for me to remember, just don’t forget to add new network devices to your zone files when bringing them onto your network.

Read More

Setting up an L2TP VPN with pfSense

UPDATE:  I think it is important that I inform readers that this guide is strictly for setting up and using L2TP.  It has come to my attention that many of you are are looking for a L2TP/IPSec solution, which is currently not supported in PFSense as of the version I am using (2.0.1).  I will update this post with full L2TP/IPSec instructions once this functionality has been added in new versions of PFSense.

I’ve been toying around with setting up a home VPN for about a week or so now, which has progressively improved.  At first, I had a working VPN implementation with PPTP and life was good.  But apparently  PPTP is known to be less secure than other methods.  So that got me thinking about beefing up my security.  Here’s a quick summary I found.

PPTP has been the subject of many security analyses and serious security vulnerabilities have been found in the protocol. The known vulnerabilities relate to the underlying PPP authentication protocols used, the design of the MPPE protocol as well as the integration between MPPE and PPP authentication for session key establishment.

After discovering this information I decided to poke around for a little bit to decide what would work the best for me.  There were pretty much two options when it came down to setting up my VPN server the way I wanted it.  L2TP and OpenVPN.  They are both considered secure and from what I’ve read OpenVPN is considered slightly better.  The reason I chose L2TP is becuase it is built in to the VPN client on pretty much every OS these days, making client set up and configuration fairly quick and painless (I’m sure its not difficult to set up and use OpenVPN either but I didn’t get that far, maybe I will experiment with it in the future).

There isn’t really all that much to getting things up and going.  Open up the pfSense management interface and navigate to the L2TP VPN settings.  VPN -> L2TP

Next, we have to configure our settings.

  • Server address – Use an ip address that doesn’t fall into the subnet that the VPN clients connect to.  I used my external IP address to make things easier.
  • Remote address range – This will be the subnet that VPN clients connect to.  I am using the 192.168.2.0/24 subnet.
  • Subnet mask – I am using the entire subnet so I chose /24.
  • Number of L2TP users – pretty self explanatory, I have 10 right now for testing purposes.

>I left everything else as the default initially.  Here is what the configuration page looked like for me when I got everything working.  Remember to change these values accordingly.

Next we need to throw up some user accounts.

So far so good.  Now we need to set up some traffic rules for our L2TP clients that connect.  This is the absolute most basic method you can go with, so if you have restraints here you will need to adjust these settings.

<

The last and most important piece to get this working is setting up the firewall rules for the WAN interface.  I got stuck at this part and didn’t realize there were two sets of ports that I needed to allow through for things to work correctly.  Port 500 for Internet Key Exchange (IKE) UDP traffic and port 1701 for L2TP UDP traffic.  Here’s what the rules look like.

That should be it.  Try connecting to your VPN server with an endpoint client.  I was testing this with my Android phone and had no problems after creating the two firewall rules.  Happy VPNing!


Read More

Gather system details using BGInfo

I keep telling myself that I will write more blog posts but keep finding ways not to.  I keep getting more ideas to write about so I just need to kick myself into gear and get going on these.  The protip this February is a useful trick for getting quick and easy access to important server information using a tool written by Bryce Cogswell of the Sysinternals suite, called BGInfo.  This tool comes in handy when you begin to manage more than a handful of servers and need to keep your p’s and q’s straight.

So, to start things off I have made a quick guide for setting up a nice BGInfo background for Windows computers.

I found out that this script doesn’t update the background for users in Windows 7 unless you  explicitly tell it to write the background upon login.   So if you are interested, the color scheme  I have elected to use is R:29 G:95 B:122 (which happens to be the default Server 2008 background).

I have found it useful to gather a few extra   pieces of information through WMI as well as a few vb scripts to make my life as an administrator easier, plus these are kind of cool.  Adding to the basic information I have added free memory, number of processors, brand and  model.   I’m sure there are others but I haven’t had time to experiment with them yet.  Maybe you can come up with some suggestions?

Free Memory script:

winmgt = “winmgmts:{impersonationLevel=impersonate}!//”

Set oWMI_Qeury_Result = GetObject(winmgt).InstancesOf(“Win32_OperatingSystem”)

For Each oItem in oWMI_Qeury_Result
iFreeMemory   = oItem.FreePhysicalMemory
Next
iFreeMemory = Round(iFreeMemory/(1024))

Echo “” & iFreeMemory & ” MB”

Note: This will only check the amount of free memory when the script is run, either at logn or if the bginfotemplate is run manually.   It does not update itself otherwise.

Model:

SELECT Model FROM Win32_ComputerSystem

System Brand:

SELECT Manufacturer FROM Win32_Computer System

Processors:

SELECT NumberOfProcessors FROM Win32_ComputerSystem

We will need the following files for BGInfo to do its thing once we have adjusted our templates  to suit our needs.

To have the background populate when a   user logs in, we need to set up a group policy.  Call it BGInfo or something easy to remember.   Edit the policy to point at Users -> Windows Settings ->Scripts -> Logon

To create the script to run BGInfo when a user logs in, copy the following and create a file named bgscript.bat

%logonserver%\netlogon\bginfo\Bginfo.exe %logonserver%\netlogon\bginfo\servertemplate.bgi /Timer:0 /NoLicPrompt

I have applied this script to a user OU in active directory called ‘Admins’.   Members of this group are the only  set of users which this policy will apply to.   So for example, people that I have given   Admin rights  will all see this background when they log on.   Which, in my case is our sysadmin team.

That’s it!  Now we have a nice clean background on all of our servers (assuming we log on with admin priveliges) to quickly look up information that may be handy and to keep yourself from getting mixed up when working on multiple servers concurrently.

Resources:

http://jensolekragh.wordpress.com/2008/08/22/using-bginfo-exe-to-create-and-evaluate-wmi-queries/
http://www.zoutenbier.nl/ict-experience-kb/windows-servers/6-implement-bginfo-with-the-group-policys

Read More

What’s in Your Windows Toolboox?

I think the title explains what I will be talking about in this post pretty well. In my day to day work, as I have mentioned before, work primarily with Windows. I thought it would be a good idea to carve out a set of must have Windows administration tools, to have as a reference in the future. A good number of these tools are open source or freeware and some are people’s pet projects, so could become abandoned over time, that is why it will be good to come back and look at every now and then.  I would also suggest donating to the independent authors to help keep their efforts alive!

Since I will just be covering the essentials I don’t really feel a need to group or categorize them in any certain way. So let’s get Started.

Windirstat

This one is pretty handy for figuring out what is eating up all your disk space by organizing your drives visually.  But of course there are a number of really handy features, like organizing directories by largest size for a quick tree view of your disk, color coating based on file types.  This one kind of falls under the category, do one thing and do it well.  It also happens to be great for quickly analyzing disk and file sizes.


windirstat

RDTabs

I would like to shake the hand of the genius who created this piece of Windows goodness.  I honestly love this program.  It is an intuitive tool to help manage RDP sessions, which happens to work out very nicely since I am in Windows all day 😀  It has matured a great deal in its lifetime and offers things like tabbing (I hope that is obvious), favorite management, a handy dandy  built in  screenshot feature, detaching RDP sessions into separate windows, encrypted passwords, importing and exporting of favorites, a boatload of options for customization and many more I’m sure that I am forgetting.  Highly recommended.  You should seriously consider checking out this hidden gem.  I believe this one is freeware, so if you like you should hook the creator up!


BGInfo

What can I say, Mark Russinovich and Bryce Cogswell are kind of awesome.  This tool is really helpful for quickly looking up information and stats (I love stats) about the system you are working on.  Essentially it creates a custom bitmap image over top of your background desktop image based on the configuration information you feed it.  Fast, easy, clean.  This utility also gives you the ability to add custom queries to check for practically anything via WMI calls or registry entries. It also has command line options for scripting, so yeah.  Good stuff.  I can’t tell you how helpful something like this is if you have 5-10 remote connections open at a time to look at what server you are on quickly.


BGInfo configuration page

Wireshark

I don’t think I want to go into very much detail for this one at the risk of looking foolish, especially since I don’t use it that much and there is a vast amount of things that this program can do.  I mean, we’re talking about stuff like graphing TCP time/seq graphs or troubleshooting performance of certain types of network traffic, crazy stuff that I have no business looking at.  What I can say though, is that it has helped me a time or two when I have been otherwise clueless on network troubleshooting issues. It is a really powerful tool to have in your bag of tricks.


JavaRa

I just found this one today actually, which was sort of the inspiration for this blog post.  I don’t know about you but I absolutely hate dealing with Java, its updates, its previous versions, etc.  This tools is a quick and dirty way to purge old versions and update to the most current version.  That’s it.  And that is how it should be, I don’t know why Sun previously or Oracle now could have made a tool to do this a long time ago.  This one is all open source.


javara

mRemoteNG

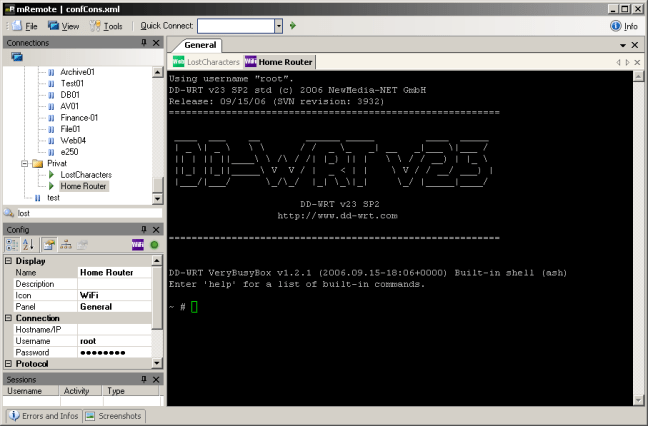
I thought I would mention this tool as well.  Although it has fallen out of favor for me personally it was my go to remote administration tool when I had Mac’s, Linux and Windows to worry about.  This tool allows for administration through a number of remote protocols including SSH, VNC, RDP, ICA, telnet, etc.  So it really comes in handy for those admins that jump all over the board in terms of different platforms.  Completely open source, highly recommended.


mRemoteNG interface

OneNote

Now before you start to hate me for this one just hear me out.  I kind of felt the same way until I actually started using it.  I have searched a fair amount for a program that does what OneNote does and nothing comes even close.  To make my life and job easier, I love to take notes on things I do for projects for future reference.  In OneNote I can organize my thoughts and process easily.  As an example, we are in the middle of an Exchange migration and our setup will be fairly complex, so I have been keeping notes for everything I am doing.  This not only helps me to understand the process more clearly but gives me a reference if shit hits the fan later on as well.

Some nice features that OneNote provides for this type of note taking are things like the ability to copy in screenshots quickly for documenting my own steps via a built in snipping tool, pasting in website links instead of having to go to research Google later on down the road once I have already forgotten what I did  originally  saving time and energy, linking to network resources and scritps, exe’s, etc. from within OneNote.  This  program really is worth its weight in gold.  If you still turn your nose up at this product since it comes from Micro$oft you might check out Evernote, I have heard good things about it, though you won’t have nearly as much power with it.


Conclusion

I think this is just the tip of the iceburg.  As I get more comfortable in my current environment I’m sure I will continue to experiment many more tools for making my life as an admin easier.  I want to point out that this list only covers my favorite Windows tools for administration, as I know there are vastly more tools out there in both the Linux and Windows world.

What feedback do you have on these?  What sorts of tools do you like to make your life easier?  I would really like to hear your feedback.

Read More

Feeding your mail gateway a proper spam diet

In a previous post I described the process of how to get a Linux based mail filtering gateway set up on your network to check for viruses and do some basic filtering, eventually delivering messages to your Exchange server.

In this post I will expand on the various ways to “train” and customize your SpamAssassin mail filter to do more checks to weed out spam and generally lower the amount of junk that is making its way to your users’ inbox.

There are a number of things that aren’t enabled by default in SpamAssassin.  Obviously this isn’t as efficient as we would like, so there is a little bit of extra leg work getting everything set up the way it should be.

Tightening up Postfix:

This is the first step to improving the efficiency of your filtering process.  There are a number of checks that can be enabled in the configuration file (/etc/postfix/main.cf) here to fight the incoming spam.  I have appended these various checks to the end of my configuration posted previously to lower the amount of spam getting through by ensuring proper sending addresses, valid recipients, proper domains, etc.

smtpd_helo_required = yes
smtpd_sender_restrictions =
 reject_non_fqdn_sender,
 reject_unknown_sender_domain
smtpd_recipient_restrictions =
 permit_mynetworks,
 reject_unauth_destination,
 reject_invalid_hostname,
 reject_unknown_sender_domain,
 reject_unknown_recipient_domain,
 reject_non_fqdn_recipient

Configuring these properties will cause an immediate drop in the amount of spam that makes its way through the filter so the importance of getting this implemented cannot be overstated.

Make your spam filter happy, feed it spam:

The next technique that I will discuss took me FOREVER to figure out, so I hope that by sharing what I have learned I will help people save time in their own implementations.  It didn’t help that IMAP wasn’t enabled on our Exchange server, but I will save that story for another day.

Essentially you want to get a good chunk of SPAM and HAM emails messages to your mail filter for SpamAssassin to apply it Bayesian filtering techniques to learn how to classify incoming messages(statistical analysis stuff, I don’t know a lot about the specifics).

My first thought was to have users copy SPAM messages into a public folder on my Exchange server and pull the messages down directly to my mail gateway.  BUT that dream was shattered when I discovered that IMAP support for public folders had been dropped in the version of Exchange I am using (Exchange 2010).

So I dabbled with a few ideas that weren’t very graceful, the most notable of which was copying the Exchange public folder into Thunderbird then copying the mbox file from Thunderbird to the mail gateway, yuck.  I finally got some help from my friends over at ServerFault.  I basically had to install and configure fetchmail to go out and look for two specified mailboxes on my Exchange, one SPAM account (a spam collection account I created) and one HAM account (my personal inbox).

To install fetchmail issue the following command:

sudo aptitude install fetchmail

Next, we need to configure fetchmail to look at our specified IMAP acounts, so we need to edit the config file ~/.fetchmailrc

poll mail.domain.com protocol IMAP port 993:
auth password user "domain/spamacct" with password "password" ssl
auth password user "domain/hamacct" with password "password" ssl

Modify the permissions so that only the specified user can read/write the config file

chmod 600 .fetchmailrc

Finally you should be able to pull the emails onto your mail gateway by issuing the following command:

fetchmail -a -v -n -k --folder inbox

At this point the mail should be on your mail server in the directory /var/spool/mail/USER.  The final step is to feed the mail into the Bayesian filter provided by SpamAssassin.  To do this, issue the following command:

sa-learn --showdots --mbox --spam spam
sa-learn --showdots --mbox --ham ham

I had to fool around with the mail file names when I first copied them to the server to read as “spam” and “ham” but that should be easy enough to accomplish.

To check how the learning process is going we need to check the sa-learn database for the tokens, ham and spam it has received.  There are a few ways to check the database but the easiest I have found is to enter the following into the command line:

sa-learn --dump magic

This will output a number of results, the most important of which are the nham, nham and ntoken outputs.  Here is a sample from the initial training stages from my spam filter:

bruticus@bruticus:~$ sa-learn --dump magic
0.000          0          3          0  non-token data: bayes db version
0.000          0        341          0  non-token data: nspam
0.000          0        210          0  non-token data: nham
0.000          0      69078          0  non-token data: ntokens
0.000          0 1318421928          0  non-token data: oldest atime
0.000          0 1319205954          0  non-token data: newest atime
0.000          0 1319142287          0  non-token data: last journal sync atime
0.000          0 1319142287          0  non-token data: last expiry atime
0.000          0          0          0  non-token data: last expire atime delta
0.000          0          0          0  non-token data: last expire reduction count

Ideally you want the nham and nspam outputs around or above the 1000 message mark, but the filter can begin working with as little as 200 of each.

Also, I have read that the best way to train is to feed SpamAssassin the newest spam and ham messages that you have, so make sure to look for the newest messages to feed it.  I read that it has something to do with the Bayesian analysis.

NOTE:  Try to do the spam/ham learning step of the process in off hours or a slow time because it adds a tremendous amount of overhead to Postfix to process all the messages as well the machine itself taking up a large chunk of memory.

That’s it. The spam filter should be able to filter out even more messages now thanks to the bayesian filtering that we just enabled.

Final Step:

This one may or may not be overkill, I just implemented it yesterday and haven’t had a chance to get any feedback from it yet.  If you are in a multi-language  environment  this addition may not be feasible either.  With this step we are going to enable a SpamAssassin plugin to attempt to detect the email language and filter out everything that isn’t either English or Spanish.

To do this we need to enable the plugin so open up the SpamAssassin config, /etc/spamassassin/v310.pre and uncomment the following line,

loadplugin Mail::SpamAssassin::Plugin::TextCat

Then we need to edit the main SpamAssassin configuration file, /etc/spamassassin/local.cf to filter out all non English or Spanish languages, this line can be added anywhere, I chose to add it under the Bayesian filtering sections.

ok_languages en es
ok_locales en es

Conclusion:

That is pretty much it, at least for now. There are possibly a few other things to modify but I need to see how efficient the spam filter is at this point before I decide if I need to add any more layers.  I have a feeling that things are pretty good at this point and adding more filtering wouldn’t really add much value to the filter.

I am very satisfied with the results that I have attained with this project and hope to keep refining the process as I see fit.  Although, at some point I think I am just going to need to take a look at is and say “enough is enough”.  So, if you have any questions or ideas for improvement let me know, I would be glad to hear them.

Resources:

http://wiki.apache.org/spamassassin/SingleUserUnixInstall#Enable_IMAP_LearnAsSpam_folder
http://wiki.apache.org/spamassassin/RemoteImapFolder
http://www.byteplant.com/support/cleanmail/howtolearnexchange.html
http://faisal.com/docs/salearn
http://allaboutexchange.blogspot.com/2007/08/how-to-configure-spamassassin-bayesian.html
http://serverfault.com/questions/320594/bayesian-filtering-for-exchange-2010/320838#320838
http://www.howtoforge.com/debian_etch_fetchmail
http://spamassassinbook.packtpub.com/chapter9_preview.htm
http://www.linuxhomenetworking.com

Read More