If you are having trouble installing previous versions of the .NET framework on Windows Server 2012 and above, or are receiving the following error listed below, use this set of instructions.
Find and mount the original Windows Server 2012 ISO. An important thing to make note of is the drive letter that the image gets mounted as.
Once the ISO is mounted and we have correctly identified the drive path we need to enable the .NET Framework. This can be done through command line using the dism.exe command or alternatively throught the Windows GUI.
First we need to enable the .NET features on the server. Notice in the command I am using the F: drive.
From time to time, a ticket will be created in regards to System Patches failing in an SCCM environment. To fix this, there are really only two major steps:
Rename the C:\Windows\SoftwareDistribution folder to SoftwareDistribution.old (stop Windows Update service before renaming, then restart the service).
Rename C:\Windows\System32\catroot2 to catroot2.old (stop the Cryptography service before renaming, then restart the service).
After this is done, run these actions from the configuration manager:
Discovery Data Collection Cycle
Software Updates Deployment Evaluation Cycle
Software Updates Scan Cycle
The procedure above has taken care of the issue pretty reliably. If the updates still don’t install properly, you may have to download the specific updates and install them manually.
It seems like everybody is using git these days. And for most, not everybody is stuck using Windows in their day to day workflow. Unfortunately, I am. So that means it is much more painful to get up and running with a lot of the coolest and best open source projects that are offered by members of github and other online code repositories being shared via git. However, there is hope and it is possible for Windows users to join the git party. So in this post, I would like to describe just how to do that. And it should only take a few minutes if done correctly. I will mention beforehand that there are a few steps that need to be completed in order for this technique to work successfully that typically are taken care of in a Linux or OSX environment.
The goal of this post is to work through these steps as best I can to get users up and running as quickly as possible and as easily as possible, reducing the amount of confusion and fumbling around with settings. This post is designed for beginners that are just getting their feet wet with git but hopefully others can use it as a resource if they are coming from a different environment and are confused by the Windows way of doing things.
First step – Download and install the git port for Windows.
This is pretty straight forward. Download and run the executable to install git for Windows. If you just want to get up and running or are lazy, you can leave all of the defaults when you run through the installation wizard.
Second step – Add the git binaries to your system path variable.
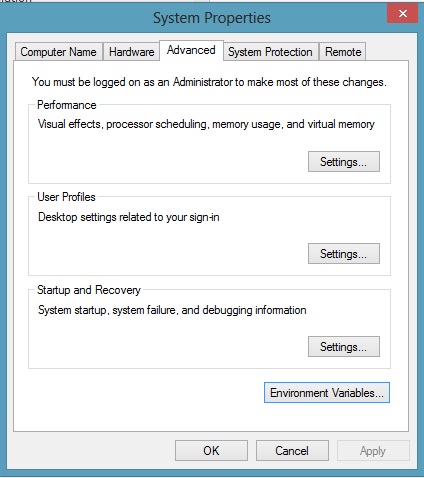
This is the most important step, because out of the box git won’t work in your ordinary PowerShell command prompt, it needs to be opened separately. So to fix this and add all the necessary binaries open up your environmental variables (in Windows 8).
Third step (optional) – Download and install posh-git for better PowerShell and git integration.
I have highlighted part of this process before in an older post but will go through the steps again because it is pretty straight forward. To be able to get posh-git you need to have a sort of PowerShell package management tool called PsGet (instructions here). To get this tool run the following command from your PowerShell command prompt.
Once the command has completed you should be able to simply run this install command and be finished.
install-module posh-git
That should be it. With these simple steps you should be able to utilize git from the command line like you are accustomed to on other operating systems. As I said, there is a tad more leg work but you can really utilize the flexibility of PowerShell to get things working. I hope it helps, and as always let me know if you have any tips or questions.
Offline files in Windows are a set of features that essentially give users the ability to work with files off of or outside of the network. So for example if a user had a laptop that had a mapped drive or network share and were to take their computer outside of the network, the features offered by offline files would allow this user to continue working with these files. I will not cover the details of how all of this magic works in this post, I just want to show people the best way I found to disable this feature with the least amount of problems. If you want to go straight from the source, here is the original article the gave me about 95% of the information necessary for accomplishing this task.
The remainder of this post will detail my findings and experience from the link above. This feature (offline files) is enabled by default in Windows 7. Here is a good overview of the benefits of offline files. However, for me personally as an admin, this feature so far has caused much confusion in the work environment for users that are not accustomed to having such a feature in our move towards Windows 7.
These settings can of course be controlled on a per user basis by changing the settings and configuration of the “Sync Center” tool in Windows. But when you are involved in a larger environment and need this sort of process automated for many users, Group Policy becomes the most effective way to handle this problem. There are a few steps to get offline folders disabled correctly so I thought I would share all the pieces in case somebody runs across a similar need as I did. The first step to disable the offline file features is to adjust the following settings in Group Policy:
Allow or Disallow use of the Offline Files feature: Disabled
Prohibit user configuration of Offline Files: Enabled
Sync all offline files when logging on: Disabled
Sync all offline files before logging off: Disabled
Sync offline files before suspend: Disabled
Remove “Make available offline” command: Enabled
Prevent use of Offline Files folder: Enabled
Next, we need to tell Group Policy to shut off the offline file service and disable it on all Windows machines that have the service installed (Windows XP, 7, 8 machines). To do this you will need to modify your Group Policy settings on a machine that has the service installed it already, through RSAT. This is an important step, you will not be able to find this service if you are adjusting the GP settings from a server. This service is located in the following location:
Computer Configuration -> Windows Settings -> Security Settings -> System Services
The specific service we are looking for is the “cscservice“, which corresponds to the service labeled “Offline Files” in the Windows services list.
The last step to get this policy working correctly is to add in a registry key that will fix machines that have already been used to cache certain network resources. Essentially adding this registry key tell the machine to blow up its database of offline files and tells the machine to remove the cached files as well. To configure this settings we need to add in a custom reg entry:
Computer Configuration -> Preferences -> Windows Settings -> Registry
Key: HKEY_LOCAL_MACHINE\SYSTEM\CurrentControlSet\services\CSC\Parameters Value name: FormatDatabase Value type: DWORD Value data: 1
Here is a good article with instructions on how change the registry settings by hand and a screenshot of my own GP environment with how the settings should look via the GP Management Console.
That should be all the necessary changes that need to be made. If I missed anything let me know, hopefully this will save people time in the future.
In the next few posts I will be going over some of the basics on how to get the Nexus 1000v setup and working in a Hyper-V environment. I must warn readers ahead of time, this product was just released (as of a week or two ago) and the Cisco documentation is seriously lacking. What documentation that does exist is thoroughly confusing so it may take some time to work through all of the issues. Just as much if not more irritating, the Hyper-V way of doing things is just as confusing. Taking on a project like this will surely improve your skills and abilities with virtualization, especially network virtualization. I must admit, this stuff can get very confusing at first so it is important to realize that you might not understand everything at first, just be patient, it will eventually start making more sense.
First I need to lay some ground work. I think it’s important not only in this example but a good habit in general to spec out a project and figure out all of the requirements in order to make sure you have everything lined up that you might need before tackling a project. A few important considerations when working with the 1000v are to make sure the networking and NIC’s on the Hyper-V hosts are set correctly, Virtual Machine Manager (SCVMM) is installed and configured, the network is configured (LACP port channels, trunk ports, correct VLAN assignment, etc) and that configuring all of these pieces won’t cause any downtime or other issues with your production network. Ideally, all of this would be thought of and set up ahead of time. Luckily I have a test environment as well as SCVMM in my test environment to test this with and do not have to worry about any real world down time or production issues.
One of the most important things to get established is getting the underlying Hyper-V network stack configured properly. I try to mimic a production type environment as much as possible so this configuration is a typical design you may see in the real world. So let’s lay out the structure of the design.
Management VLAN(s)
DMZ VLAN(s)
Inside VLAN(s)
Live Migration VLAN(s)
It is common to break these out through different physical connections, so as an example you might see 4 different NIC’s on the Hyper-V host connecting to a switch that has 4 different VLAN’s configured. If you want redundancy you can add NIC teaming into this scenario (which is native in Server 2012 now, which is nice). I have limited resources so I am using a single NIC for management, DMZ and live migration traffic, and teaming the inside connection with 2 NIC’s. Here is a crude example of how this is setup.
If you are setting this up in a clustered environment, you would want these settings to be identical across all Hyper-V hosts. Once this is setup correctly make sure you have SCVMM installed and configured. That is a separate process and therefore is out of the scope of this post, I’d be happy to answer any questions you have, I’m just not discussing it here. You will need to grab the Cisco Nexus 1000v for Hyper-V. To download the files necessary for installation (let me know if you don’t have one) you will need a valid Cisco ID. Cisco also provides some documentation as well as some installation videos links but I have found them to be less than helpful to be honest, there is some useful information to be sure, I just want to walk you through the process myself because there were a few caveats and the documentation creates a lot of unnecessary confusion.
There is some basic terminology to be familiar with when getting the 1000v up and going that helps to understand how and why different parts work the way that they do when running through the installation.
vsm – virtual superviser module. This logically controls the virtual switch and can be thought of as a virtual line card to manage the different VEMs.
vem – virtual ethernet module. This is the piece that actually replaces the virtual switch
nsm – network segmentation manager.
Once you have the 1000v downloaded you need to make sure you run the installation for it on the server that is hosting SCVMM. The installer is hidden in the following location,
When you run this executable it should bring up a GUI to install and configure the virtual switch(es). You will need to use an account that is a member of the SCVMMAdmins group in Active Directory, otherwise the installer will not be able to connect to SCVMM and will not be able to create and configure the VM for the new virtual switch.
The next portion of the installer is where things may get confusing if you don’t know what you are looking for. I have linked to the sample configuration I used in my lab to help with this. Since this is what I used in my test environment I know at least at one point this configuration worked. It would be a good idea to deploy the VSM’s in high availability if you can, otherwise it isn’t a big deal.
Choose a meaningful name for VSM name, basically this is the same as the host name.
The ISO linstall location is, \Nexus1000v.5.2.1.SM1.5.1\VSM\Install\nexus-1000v.5.2.1.SM1.5.1.iso.
From the documentation I’ve read the VEM MSI location indicated is a little misleading because it points at the wrong installation file. It should point at \Nexus1000v.5.2.1.SM1.5.1\VMM\Nexus1000V-VSEMProvider-5.2.1.SM1.5.1.0.msi.
The VSM IP address should be an address in your management network, it can basically be thought of as the address to use to connect to the 1000v virtual switch.
Subnet mask should be fine as 255.255.255.0.
Gateway IP should match up with the VSM IP address, essentially they just need to be on the same subnet.
Domain ID is an arbitrary number that is associated with the virtual network. For most use cases you should be able to use one ID, 1000 in my example.
Use the VLAN ID that your VSM is on, in my case it is my management ID.
Since our management VLAN is that same as the VSM VLAN (typical in most deployments) simply choose “Yes” here.
At this point everything should be configured, the installer just needs to go out and create the VM’s and take care of getting everything up and running. It may take awhile so take a break if needed and come back later.
Everything should complete successfully, if not you will need to look at the log file and troubleshoot any errors you may have.
Almost done. Everything should be out there and running but there is still one very important step left. If you notice, about halfway down the installation summary page there is a username/password of admin and admin. This obviously will change once the 1000v gets put into use but there is NOTHING in the documentation that tells you that this will break the configuration in SCVMM!
What you need to do is hop on the SCVMM server and manually configure the credentials that are used to connect to the 1000v switch. To do this, drill down into the security settings in SCVMM by flipping open the Configuration pane -> Security -> Runas accounts -> Right click your 1000v admin account and select properties.
Then you will change the username and password to match the credentials that you have set on the 1000v. This will allow the switch to communicate with the SCVMM server so that 1000v network settings can be managed through Hyper-V.
In Part 2 I will discuss the intricacies of configuring the 1000v as well as how to reflect these settings in your Hyper-V virtual environment. Since this is a brand new product, there are still some things yet that need to get worked out, especially the documentation. And as I mentioned earlier, the network settings in Hyper-V and SCVMM can be extremely confusing the first time you see them. Working through and troubleshooting these issues will quickly help improve your knowledge and understanding of how Hyper-V and the Nexus 1000v work together to improve virtual networking. If you have any questions or concerns about any of this I will try to help, but I am not promising anything at this point.